How to send a survey with multiple questions in Jira Service Management (Jira Cloud & Jira Data Center)
Hello All,
Out of the box Jira Service Management only allows to add one question for the customer satisfaction (CSAT) survey once a ticket is resolved. But most teams like to collect feedback on different aspects of the support provided to the customer by adding more than one question. In this blog I will go over a workaround to send multiple questions to the customer when a ticket is resolved.
Scenario
- Support team uses Jira Service Management to work on customer requests.
- Once a request is resolved an email needs to be sent to the customer with a survey including multiple questions.
- Survey response needs to be tied to the Jira ticket number.
Solution
- In order to send multiple questions we will use a google form.
- When the ticket is resolved the reporter will get an email with a link to a google form containing the survey questions.
- The first field of the google form will contain (this will be autofilled) the issue key where the user received the survey.
Given that we are not using the default customer satisfaction (CSAT) survey, make sure to disable this first.
Creating the google form
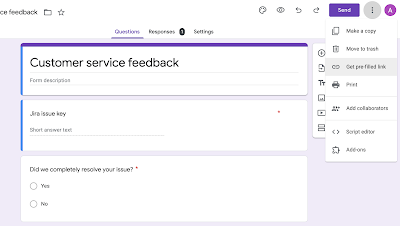
Once the Jira ticket is resolved, reporter of the ticket will get an email containing a link to a google form to collect feedback on the support received. Below is a sample of the google form that we can setup.
Follow instructions in here to create a google form with specific questions you need to include. Make sure there is a short text field for the Jira issue key. In that way we can make sure surveys are linked to a Jira ticket.
Getting a pre-filled link for the google form
Now that the google form is created, we need a way to auto populate the Jira issue key into the google form when the reporter clicks on the link.
This can be done by url parameters. We need to identify the ID of the "Jira issue key" field on the google form first. Then we can set a value to this field by updating the url.
In order to find the unique ID of the field, we need to get the "pre-filled link" of the google form we created. Follow below steps to get a "pre-filled link" with the "TEST-1" value set for the "Jira issue key" field.
Step 1 : Open the google form in edit view.
Step 2: Click the "Get pre-filled link" option under the three dots.
Step 3: A new tab will open with the google form. Then enter "TEST-1" into the "Jira issue key" field.
Step 4: Click on the "Get link" button at the bottom.
Step 5: Then you will see a pop up on the bottom left of the screen. Click on the "COPY LINK" section in that pop up.
The link that was copied will look something similar to this (Below exact url has been disabled for privacy reasons) :
https://docs.google.com/forms/d/e/4FAIpQLScxLPjuQ4fvwE5eNLOl862w76S6M9aXtM1xEz0pCxJhqOdfig/viewform?usp=pp_url&entry.2000496593=TEST-1
Important part of this link is "entry.2000496593=TEST-1". The part "entry.2000496593" is the ID of the "Jira issue key" field in the google form and "TEST-1" is the value that goes in to this field.
Updating the Resolve notification to include the survey url
Now that we know the ID of the field, we can change the Request resolved customer notification in the Jira service management project to include the actual Jira issue key in the email to the customer. We can do this by replacing "TEST-1" with "${issue.key}" in the url.
Let's follow below steps to make the above change.
Step 1 : Navigate to the customer notification section in the Jira service management project
Step 2 : Open the "Request resolved" notification template by clicking on "Edit"
Step 3: Then update the notification template to include the pre-filled url of the google form and add entry.2000496593=${issue.key} to include the actual Jira issue key.
Make sure to only keep "Reporter (customer)" in the "To" section. This will make sure only the reporter of the request receive the email containing the link to the survey.
Step 4: Save the changes.
Sample of the email that will be sent to reporter when the request is resolved.
Once the user clicks on the link in the above email, user will be directed to the below form where Jira issue key is auto filled.
Thank you for taking your time to read this blog. Hope this helps!


Comments
Post a Comment